preamble
This article (and associated presentation) is part 2 in a series on double stars. In this chapter, we will dive deeper into the subject and discuss measuring double stars.
UPDATE! See below. We have additional information on the math formula to use.
If you are extremely interested in double star observing and would like to proactively conduct research, you can help gather missing data. While there are many known double stars, we have surprisingly little data on binary systems. Do you want to take it up a notch? Citizen scientists, amateur astronomers like you and me, can easily contribute to this body of knowledge. Collecting two pieces of data, the separation and the position angle, for a binary system, we can learn a great deal of information about stars, stellar classification, stellar life cycles, etc.
While underrated, double star astronomical targets are beautiful, fun, easy, dynamic, and colourful. For those interesting in improving their visual observing skills and pushing their equipment to the limits, doubles and multi-star systems offer many challenges. Perhaps the best feature of doubles is their resistance to light pollution meaning they can be viewed anywhere and any time. In Feb ‘18, a primer presentation, part 1, was delivered on double stars. See Blake Nancarrow's the article (and video) entitled "Unnoticed treasures" for more information.
Blake Nancarrow delivered this part 2 presentation on double stars on 15 August 2018. It was entitled "Missing data. Measuring double stars." These notes were written to accompany the presentation proper. The talk was live-streamed and video recorded.
[Edited on 16 March 2019 correcting minor typographical errors and incorrect separation information for Sharatan in Aries.]
UPDATE!
Meade Astrometric, Celestron Micro Guide, and baader planetarium Micro Guide reticule eyepieces are no longer available new. You may only be able to buy used.
In August 2021, baader planetarium posted an “important note” on their product page. It is essentially asking people to indicate their expression of interest. If their is significant commitment, they will resume production. So, if you want to own a brand new CMG-style or official baader planetarium reticule eyepiece, this might represent your last chance.
See the baader product page for more info.
Update to the update. Purportedly, Opticstar in the UK has the Meade Astrometric eyepiece for sale.
And vote now!
measuring - casually
Why would you want to measure doubles? Well, for me, it is a fun and intriguing thing to do.
Often double star lists quote separation and position angle so I want to see if my results compare well. Frequently they are different. At first that was off-putting but now I realise it is common!
It is also quite fun when viewing a "fast-moving" system. Some binary star systems change position over 50 or 100 years. That means an annual examination or sketch made every year should show motion. That'll be fun looking back through old log notes seeing a star change its position.
This emphasises the importance of keeping good logs. Later when you review, you may discover the B companion that was oriented NW is now to the North. And closer. If you make detailed sketches regularly, you could make a flip book!
Did you know that Sharatan (beta Arietis) is super fast-mover with a period of 107 days?! Visit this dynamic double star a couple of times in the same season. [Edit. Correction. At the time of writing, I was under the impression Sharatan was a wide visual pair at approx. 70" separation. Upon reviewing the WDS and other sources, it was determined that it is an extremely tight double at less than 0.1"! Spectroscopic not visual...]
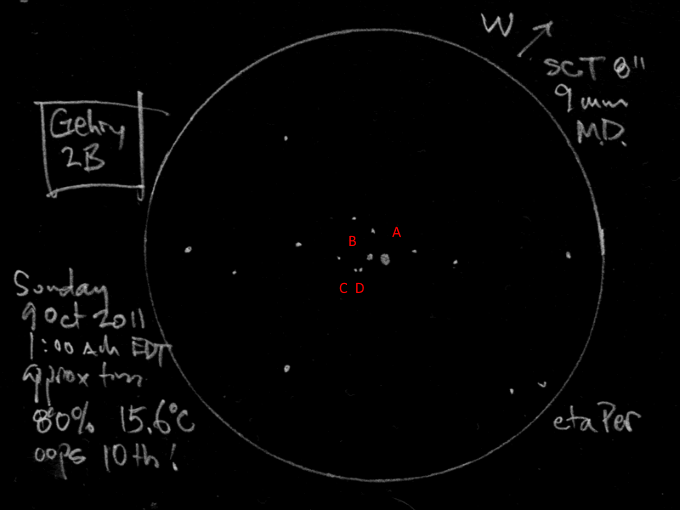
Casually noting separation and position angle can be done live at the eyepiece or afterwards from a decent sketch.
From my quick drawing (above) of eta Persei (aka Miram), a multi-star system, I can see that A and B are fairly wide while C and D are tight. C is two times or more the AB distance. The AB and CD pairs are similar in their alignments, roughly south-east to north-west. Taking it up a notch, we can try to quantify the separation and PA. I estimate the separation of A and B in my sketch at approximately 1/32 of the field of view. The "calculated" value of the true field of view (TFOV) for my telescopic system is 21.8 arc-minutes. That means A and B would be about 41 arc-seconds apart. The actual separation is around 29". Not bad for a crude sketch.
I can see from my rendering that East is to the top-right and I know that North is to the top-left given the mirror-reversed or laterally-inverted view presented by a Schmidt-Cassegrain Telescope with mirror- or star-diagonal installed. This means the AB angle is to the NNW or (going clockwise) approximately 310 degrees. The actual position angle is around 300. Once again, a pretty good result for just "eye-balling" it.
measuring - formally
"Because so few professionals remain in this field, qualified amateurs are badly needed." - Ron Tanguay
Why would one want to accurately measure double stars? To collect missing data.
Now, admittedly, some may view this activity as "work." But if one carefully assesses the separation and position angle between a pair of stars, measures the values with some accuracy, and reduces the data to yield precise results, the observer can provide valuable information about the star system in question. Remarkably, with just two numbers, we can calculate the total mass of the system. And that data is very important in our understanding of stars, their formation and classification, which is foundational information for astronomy and cosmology, and directly impacts distance calculations used in the cosmic ladder. It is surprisingly important data.
Measuring doubles enables the astronomer to contribute scientific data, like variable star observers (see the AAVSO organisation), in turn expanding the body of knowledge on stars.
Double star measurement, like variable star assessment, is citizen science that anyone can participate in.
It may require the acquisition of some additional astronomy equipment and accessories.
All things considered, it is relatively easy to do. And if you appreciate Mr Tanguay's missive, must be done.
everything’s moving
Which stars should we look at? It may seem daunting at first given everything is moving...
If you examine the video made by the European Space Agency (ESA) based on photographic data collected by the Gaia space probe, you will see stars flying around in space, like fireflies in a forest. Note the timescale at the top-right. In short order, you are hundreds of thousands of years into the future so this is a bit of an aberration.
Still, things to look for in the video are groups of stars travelling together. These may be stars in an asterism or open cluster that are somewhat close to each other and perhaps gravitationally affecting each other. That said, they are generally light-years apart. We are not interested in measuring these stars per se; we want to measure binary systems.
This is a good reminder though that everything is in motion. Stars orbit the galactic hub, families or groups of stars are moving in particular directions, and we’re moving too (toward the constellation of Hercules)!
proper motion
To know if a pair of stars is a binary system or not may initially require multiple observations. And that may mean a long term commitment. Actually this is not something you need to concern yourself with in that a source for double stars provides candidates, a "short list," that need observations.
If we were to examine a pair of stars over a long time, keeping good notes or regularly sketching or photographing them, we might notice motion, changes in position. We might see that while the background stars are motionless (effectively), we have a bright pair of stars moving. Over the course of about 50 years, a pair of stars may move together west to east, for example. They are like a pair of dolphins swimming in parallel in the ocean. They are moving in the same direction at the same speed. As we continue to monitor the pair, we may discern distance between the stars however does not change. The angle of the stars in relation to one another does not change. These stars are described as "showing high proper motion." This is fairly common with stars in open clusters. This is common with "optical" double stars where one star is in the "foreground" while the other is in the "background" and they are often dozens or hundreds of light-years apart.
When we observe proper motion but no change in angle or separation we can ignore these doubles. We're not interested in measuring these.
orbital motion
The double star systems we're most interested in and will want to measure are those that exhibit orbital motion.
Again, if we repeatedly observe a pair of stars, we might notice motion. If the motion reveals one star as fixed and other moving, moving in a curved path, that is very telling. If the stars draw close together, then move far apart, and then tighten up again later, we are witnessing orbital motion, like planets around a star, or moons around a planet.
A pair of stars can be angled to the Earth in any direction. The plane of that distant system may be face-on, canted, edge-on, and anything in between.
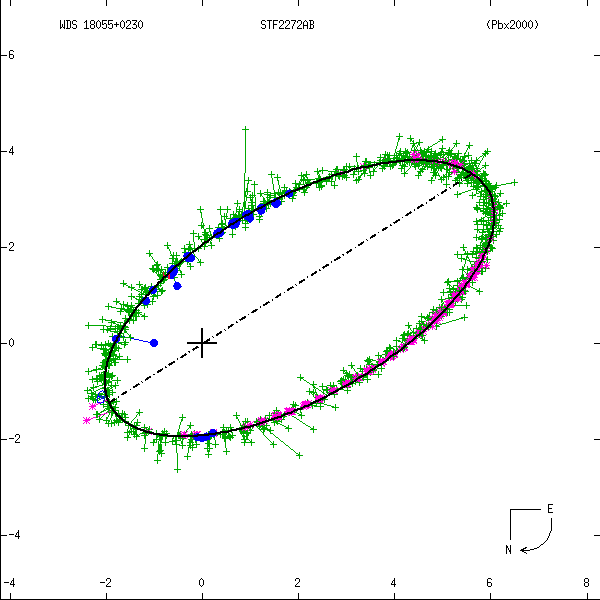
Examine the diagram (above) with the ellipse. This is a canted binary system plot. It clearly shows multiple data points, the green pluses, and then the blue dots, illustrating data collected by different means over time. Let's imagine that initially, there was little data on this pair and the first observation was made at the top right, with the B star far away from A. And let us say, for our example, it is moving counter-clockwise around A. Then, consider, 10 years later, a new observation is made showing B a bit closer to A. The angle at this stage is very similar to the first measure. More observations start coming in. And 10 years later, the B star is closer still, but the angle is clearly changing. In another 20 or 30 years, the B companion appears very close to A, with a position angle now 90 degrees or more different than the initial. And then another decade passes and we see the B star "looping" or "hooking" around the A primary.
This illustration shows hundreds of data points and that would allow a very accurate determination of the orbit. Remarkably, only a few observations are needed to calculate a preliminary orbit.
If you repeatedly measure a binary, you can provide much of the data for a system. When many observers contribute measurements for the same system, we can rapidly determine the orbital characteristics of the system.
If you were to examine the orbital plot for Sirius, you'd note it is another canted system with a well-defined orbit.
Sirius B aka The Pup is notoriously difficult to see against Sirius A as the primary is so bright. In 1994 and 1995 it would have been most difficult given the proximity of the stars with dim B being engulfed in the glare; but in 1970s, it would have been much easier to spot B.
This system reminds use that visual observations continue to be relevant given the excellent dynamic range of the human eye. Photographs of Sirius to locate the B companion are especially difficult due to the limited capabilities of camera equipment.
quick history
Doubles have been observed for centuries.
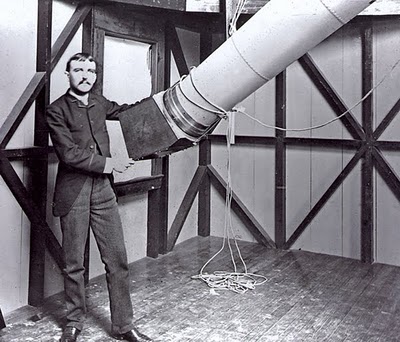
Henry Draper, one of the early astrophotographers, is shown in the photo (above). Many stars in your hand controller or computer software applications use the HD designation.
In 1767, John Michell suggested doubles might be attached or interacting gravitationally, a radical concept at the time. Today, it seems obvious.
In 1779, William Herschel began observing doubles and by 1803 had recorded the changes in relative positions of many pairs of stars. This famous observer argued that Castor was a binary system although the jury is still out on that particular target.
Félix Savary computed first binary orbit in 1827.
The Struve family catalogued thousands.
Today, the Washington Double Star (WDS) database warehouses figures on pairs of stars and is regularly updated. While there are hundreds of thousands of entries in the WDS, few systems have known good binary orbital data! And while there are more amateur astronomers viewing the skies than ever before, there are fewer contributions made than one hundred years ago.
Consequently, there are significant gaps in the WDS data. Some examples include a double star systems where initial observations were made but there's been no new data added for decades or centuries. There are many double stars to be "discovered." By that I mean there are pairs of stars, similar to other known doubles nearby, that are not catalogued as such. These systems may very well be binaries and are awaiting their first official entry into the WDS. Also, some pairs in the WDS seem to be "lost" or have bad data associated with them so require further investigation.
To help prioritise urgent required observations, the WDS team publishes a list of "neglected" double stars. One can consult this list for interesting targets to assist with. [Update: the "neglected" lists have been discontinued formally but one can easily review the WDS database and find "old" entries. Examine the last-observation-date field. Many stars will show dates in the 1800s or early 1900s.]
This is where you come in. Amateurs can help! You can improve on the body of knowledge. And you can add to the legacy of double star observations. You can submit results that will find their way into the WDS.
eyepiece astrometry
Early double star astronomers used calibrated filar devices to measure star separation and angles.
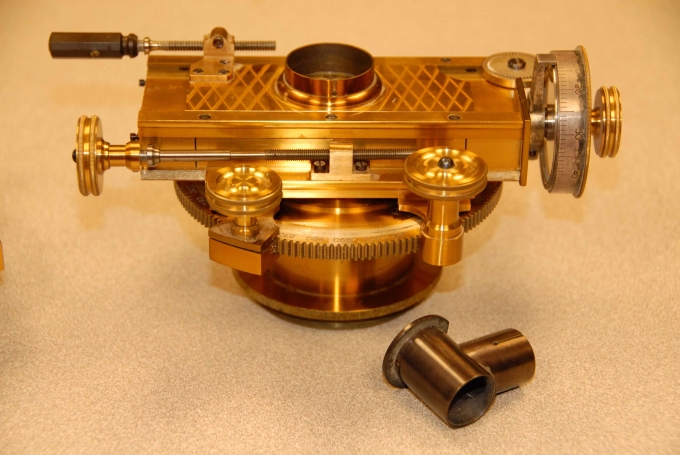
With dials and knobs, one hairline could be moved closer or further from a fixed one. These antiques (as above), if you could find one, would likely be rather expensive and they are quite bulky.
While there are some do-it-yourself (DIY) options for using calibrated systems, I have not personally seen any compelling solutions.
By far, the easiest way to visually measure double stars is to use an modern astrometric eyepiece with reticule. It is a modestly expensive eyepiece.
data needed
Variable star observers assess the brightness of their target star against known field stars. They record this data minimally with the date and time.
Double star measurement requires two figures along with the date and time. We need the separation or the distance between the pair of stars. As well, we need the position of the stars in relation to one another. We determine the angle of the secondary star from the primary using a reference starting point.
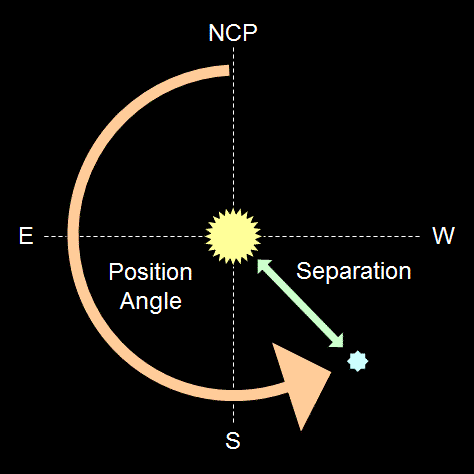
Separation, sometimes noted casually as sep., formally noted with the Greek character rho (ρ) is measured in arc-seconds. Most pairs are relatively close so the arc-seconds value may be 10 or 15 or 20. Extremely wide doubles may be noted still with seconds of arc, say 525, as opposed to switching to the larger unit of arc-minutes. Of course, the double quotation symbol (") is used as a short-form for arc-seconds.
The angle or position angle of the two stars is measured not surprisingly in degrees (°). Casually P.A. and formally theta (θ) helps us record where the stars are in relation to each other. But we need a common reference for this value. We use the North direction as our starting point. Then rotating through the East (at 90 degrees) and South (at 180°) and so on, we can indicate where the secondary star is.
When we view a regular presentation of the sky or celestial sphere, with North at the top, of course, East is on the left and West on the right. For beginners, that is confusing but this is the method used for all normal star charts and astronomical computer software. Given East is left of North, our Position Angle assessment would be done by rotating counter-clockwise around the primary star.
If you examine the diagram (above), we have no way of knowing the separation as there is insufficient information provided: we do not know the scale of the diagram. But we can easily determine the position angle. What would you guess the blue star's angle is to the yellow?
If you said around 225 degrees, that's a good answer. Starting at North, which is 0°, moving counter-clockwise (CCW), through East (90), and through South (180), we arrive at the companion star. It's about half-way between S and W so add 45° to the South marker for 225°.
orientation issues
Life is complicated. Astronomy is complicated. Using a telescope is complicated. No way around it. As previously mentioned, when measuring doubles we need to get the separation and position angle values. To determine separation, we need to know the scale in the field of view. To measure the position angle, we need to know where North is for our starting point. Complicating things is that different telescope systems present different views of the sky.
Many astronomy apps can calculate these numbers for you.
FIELD SIZE
Knowing the size of the field, the round patch of sky, you see in the eyepiece is actually fairly easy to calculate (assuming you know the AFOV)!
TFOV = AFOV / power
where:
TFOV = True Field of View in degrees
AFOV = Apparent Field of View in degrees
power = magnifying power of the eyepiece
The AFOV is a technical parameter of an eyepiece and the manufacturers of modern eyepieces will provide this datum in the specifications of the ocular.
As an example, if I use my baader planetarium Hyperion-Aspheric 36 mm eyepiece in my Celestron 8-inch SCT, it yields magnification or power of 56 times. baader planetarium quotes the apparent field of the eyepiece as 72°. Therefore the true field is 1.3°. The edge-to-edge size of the circle I see almost 1½ degrees. I can use that then if I see a very wide pair of stars that I estimate to be 1/10th of the field: the pair will be about 460 arc-seconds.
Knowing the true field size of your eyepieces, in general, is nice information to have while observing. If don't know the power or magnification of an eyepiece, you may want to calculate that first.
power = Tfl / Efl
where:
Tfl = focal length of the telescope
Efl = focal length of the eyepiece
Now, certain telescope designs dynamically affect things. As well, certain accessories may alter these values. Notably, SCT telescopes with their moveable primary mirrors affect the focal length of the telescope. If you add extension tubes or spacers or have an external focuser, the focal length of the system will not be the manufacturer quoted value. In these cases, we cannot use the quoted value for our field scale measurements. Instead, we'll need to measure it. Fortunately, there's a simple solution: drift timing.
DIRECTIONS
For position angle, as noted, we need to know where North is. And we need to know the direction to go. And to get that information, all you need to do is determine where West is, and understand the light path inside your telescope.
Do you know where West is? Simply turn off or pause the drive on your equatorial mount. Then wait. You will see the stars begin to slide out of view, drift to one side of the eyepiece. That's it! Like when we watch the Sun go down at the end of a day, everything sets in the west. The drifting stars point to the west side of the field. To get a sense of the exact westerly point, shift the telescope so that an obvious star goes into the deepest part of the curve of the field before disappearing. That may require a couple of iterations.
Now that we know where West is, North should be fairly easy to figure out. Except that... it depends!
Many books and web sites, in an effort to explain the eyepiece orientation, muddle matters with convoluted descriptions with many exceptions and ambiguous terminology or with complicated tables. When it is rather simple. You just need to count reflections.
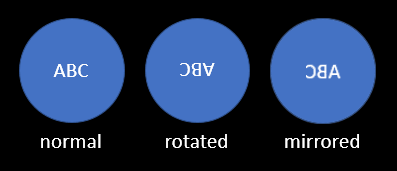
If you have an even number of reflections occurring inside the telescope system (including the eyepieces and accessories), then you will see a "rotated" view of the sky. If you have an odd number of reflections before the starlight hits your retina, you have a "flipped" or "mirror-reversed" or "laterally-inverted" view.
A rotated view is typical of Newtonian-style telescopes (with the big mirror at the back and the little mirror at the front). This would also be the view with a refractor telescope with a camera directly attached to the focuser i.e. with the mirror- or star-diagonal accessory removed. Straight line to the camera. In this case, there are no mirrors in the light path. Zero. Remember: zero is an even number.
A flipped view is the typical presentation in a SCT or refractor telescope when used in the common visual set-up, that is, we have the telescope tube, the mirror- or star-diagonal accessory, to offer comfortable viewing, and the eyepiece in the diagonal. With the refractor, there's one reflection occurring in the diagonal; with an SCT (or MCT), there's the big mirror at the back of the optical tube assembly, the little mirror on the backside of the corrector plate, and then the diagonal ahead of the eyepiece: three reflections.
Remember, the "normal" view of the sky with North up has East on the left. And again this is how all our sky charts and atlases and computer software work. If you move counter-clockwise (CCW) from North, you will first encounter East.
A "rotated" simply takes that view and spins it. A telescope with an even number of reflections will rotate the view 180°. So North will be down. But the directions are still the same! Move CCW and you'll pass through East first. Double star position angle measurement would be done by working CCW from North.
A "flipped" view is backwards like you're looking at things in a mirror. If North is up, now East is on the right. And double star position angle measurement would be assessed by rotating from North in a clockwise (CW) direction!
Still with me? We can figure out West in any telescope by letting the stars drift while the mount tracking motor is off. Then you consider the number of times the photons get reflected in the optical train of your telescope (camera) rig. Then you know if it's a rotated or flipped view.
If rotated, then North is CCW from West.
If flipped, then North is CW from West.
Being aware of W or E and N in your eyepiece field, or on your camera chip, is important information. Two compass directions at a minimum should be recorded in your log notes or marked on your sketch. When sharing photos, you can help the viewer get oriented by stating the directions. Planetary observers use this to know which way a planet is rotated. (Actually, it is a common convention to show north as down in planetary drawings and photos.) So, once again, direction information is generally good to know. It is essential for accurate double star measurement.
gather the gear
What do you need in your toolkit to measure double stars? If you want to assess separation and position angle of pairs with some accuracy, the following equipment is recommended:
- motorised EQ mount
- magnifier, e.g. Barlow
- stopwatch / timer
- note-taking stuff
- time / patience
- astrometric ocular
Don't have all that stuff? Do you have a birthday coming up?
An equatorial mount is considered very important. Double stars could be measured in theory with a Dobsonian-based telescope or from an alt-az tripod but, unfortunately, you'll have to contend with field rotation. That can introduce error into your position angle calculations.
The focal length of the telescope system in general needs to be extended. In other words, you may need to dramatically increase the magnification of the instrument. This is for a couple of reasons. It will better separate tight double stars. And it will reduce error in separation measurements. Many amateurs already have a Barlow in their kit so you may be good to go.
As mentioned previously, we will likely need to measure the true field scale by using drift timing. So we'll need a stopwatch or timer or timing app to do this. A physical digital stopwatch or a timer app with interval times is really handy.
You can do pen-and-paper note-taking of course or if you have a computer at your side you could use prepared spreadsheets to collect data and perhaps begin data reduction.
Finally, an astrometric eyepiece will prove extremely useful when doing visual double star measurement. It is not cheap, this accessory, but you may find it a useful addition to your ocular collection for uses beyond double stars. Alternatively, doubles can be imaged with camera equipment. But that's a topic for another day...
increasing scale
To increase the focal length of your system, you may use a Barlow (available from various manufacturers) or a PowerMate (by Tele Vue).
Your goal is to get the focal length of your telescope above 3 metres. If you have an 8" SCT, you’re 2/3rds of the way there. So a 2x magnifier will do the job.
If you have an 800mm apo, you'll need a 4x.
Don't have a magnifier in the eyepiece case? A 2x Orion Barlow is approximately USD $50; a 4x Tele Vue PowerMate is around USD $333.
Sorry to keep spending your money...
eyepieces for astrometry
If you are very interested in measuring double stars visually, with your existing telescope, perhaps with your Barlow, and your want to get into the game at minimal cost, but your want reasonable accurate results, then you should get an astrometic ocular.
There are two popular options. Both come as standard 1¼" barrel eyepieces with laser-etched reticules. Included is a red LED battery-powered illuminator that is mounted perpendicular to the barrel. Don't forget to switch it off at the end of the evening! You also receive an eye cup. They are fully coated.
The two are very similar. They can produce similar quality results. It may be a matter of personal preference when selecting one to purchase.
MEADE
The Meade Astrometric eyepiece reticule has Linear Scale (LS) in the centre made up of a single line with 50 division markings. This can be used for quick separation measurements. The LS is offset 90 degrees (which fans say is quite useful).
There is a Large Circle Scale (LCS) around the perimeter of the field. It has a single degree scale with markings every 30 degrees. There is also a "half" protractor. Either of these can be used for position angle measurement.
The Meade ocular focal length is 12.0 mm.
I have seen the Meade available for around CAD $110.
CELESTRON / BAADER
As I checked web sites for the Celestron Micro Guide (CMG), I noted a number of sources reported the unit out of stock. Initially concerned that this option was no longer available, I then came across the unit by baader planetarium. And as soon as I saw it I realised what likely happened in the past. baader has always made the Micro Guide but Celestron bought it and rebadged it. Happily, the baader Micro Guide is readily available from various sources. You may know that baader is now a major player in the eyepiece game.The Micro Guide is a little different than the Meade.
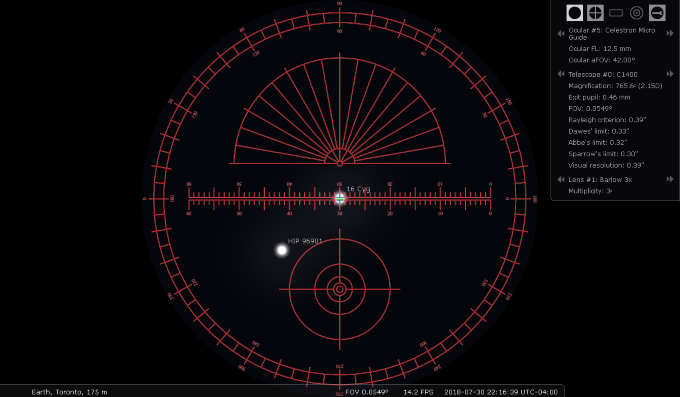
The baader/Celestron reticule LS has 60 divisions. This may offer a bit more granularity or precision with separation measurement. Also, the LS is made of two lines with a small gap between. Many find this feature helpful when drifting.
The LS is aligned to 0° or 180°. Some criticise the Micro Guide for this as it complicates calculations. But if one simple adds or subtracts 90 in calculations, the issue is nullified.
The LCS has dual markings, inner and outer markings. The inner are in a slightly larger font. Notably the inner and outer scales go in different directions. The outer values go clockwise. Some astronomers enjoy this feature as it lets you quickly read the appropriate values given the telescope field of view orientation, CCW or CW.
Some complain that LED emitter to be too bright. I've not found this an issue. There are tricks one could employ to attenuate if necessary.The Micro Guide focal length is 12.5 mm, slightly higher than the Meade.
I spotted the baader unit for sale around CAD $300.
OTHER USES
Both etched eyepieces feature a bull's eye in the field. This was provided for astrophotographers, back in the old days, when people manually guided their telescopes. That's a rare activity these days...
For people interested in improving their mount start-up star alignment routines, to improve sky modelling and pointing performance, you can use the astrometric eyepiece to ensure the alignment star is dead-centre in the field of view. Similarly, if perform "drift alignment" so to very accurately polar align a mount, such a reticule can be used for precise centring.
Calibrated eyepieces might also be used to measure the size of planets and gauge the angular distance between planets and their moons.
measurement demonstration
I would like to show how to measure a double, to obtain the separation and position angle. What follows is a demonstration of measuring a double star. This is one particular way that I am showing. There are many ways to use an astrometic eyepiece. And clever users may develop their own techniques and workflows different than what others prescribe. The method I show here is a bit of a mish-mash of different approaches with the end goal of being quick, fast, and fairly clear or easy to understand.
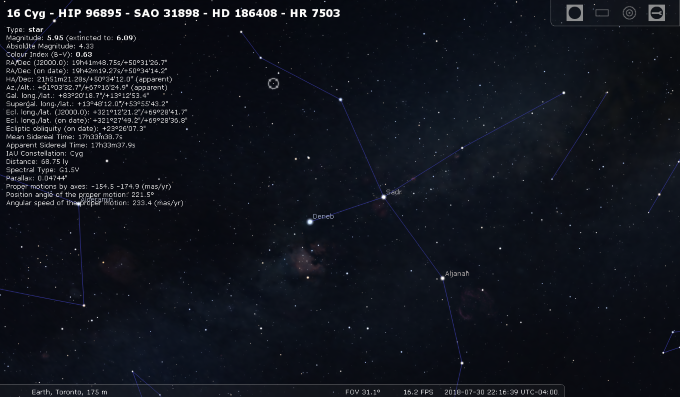
The screen snapshots were taken from Stellarium.
ASSUMPTIONS
Celestron 14-inch SCT
3x Barlow
Celestron Micro Guide eyepiece
TEST STAR
16 Cygni
RA (apparent): 19h 42m 19.26s
Dec (apparent): +50° 33' 47.3"
WDS designation: STF A 46 (Struve, First Appendix)
COUNT TICKS
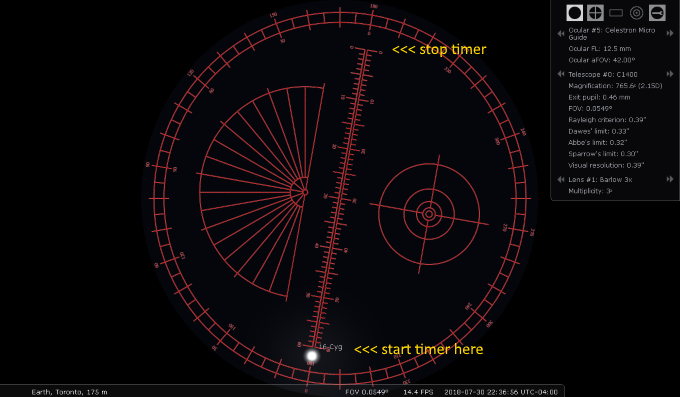
We start by slewing or moving our telescope to the target double star in Cygnus. The A and B elements are widely separated. Carefully rotating the entire astrometic eyepiece allows us to align the pair of stars along the Linear Scale (LS). And we immediately see the stars are about 15½ ticks apart (see image in eyepieces for astrometry section). What does that mean? If we knew the field size exactly, we could gauge the tick distance. But for highly accurate results, for the current telescope configuration, to get that value converted to a real world number, we need to conduct drift timings.
ALIGNING
Technically, these following steps can be done with either star. But let us assume we are working with the primary or A star.
When we turn off the drive of the mount, the stars will drift out of view (to the west, of course). As this happens, we rotate the eyepiece so that the LS is parallel to the direction of movement. Or to put it another way, the LS needs to be aligned east-to-west. This will likely take a few iterations. Accuracy is important so we should repeat as needed to ensure perfect alignment. Let the drift star run the entire length of the LS. You can speed the process by using the East and West slew buttons (only) on a Go-To mount.
Turn tracking on.
TIME THE DRIFT
Now we need to move the star to the east side of the field of view, a bit beyond the LS, or even just out of the field. This is our starting point. With a Go-To mount, connected to computer or device, with astronomy software that can issue slew commands, you can set this start point as a target in the software to rapidly return to it later. Prepare to time the drift. Ready your stopwatch or timer app.
Turn tracking off.
As the star touches the first tick on the LS, start timing. As the star reaches the last tick on the LS, stop timing. Turn tracking on. Record the drift time. For our example with 16 Cyg, the drift time is around 15.6 seconds.
Rinse and repeat. It is recommended, for quality results, you perform 10 or a dozen drift times and average the results. After the last drift time, you can "park" or leave the star at the end of the scale. If necessary, nudge it into the band of the Large Circular Scale (LCS).
NUMBER CRUNCHING
With the average drift times and knowing the star's declination, we can compute the LS division size in real world numbers which then can be multiplied by the number of ticks apart we found the two stars.
ρ = ( d * t * f * cos( dec ) ) / 4
where:
ρ = separation in arc-seconds
d = divisions or ticks on the LS, in decimal form
t = drift time in seconds
f = sidereal time factor or 1.0027379
dec = declination of the star, in decimal form
For our example with 16 Cyg, we should see a calculated value of approx. 38.5". Done.
UPDATE 1!
The formula shown above works for the Celestron or baader Micro Guide eyepieces with 60 divisions on the central Linear Scale.
Note: We now show parentheis around the first values to ensure the entire product is divided by the final value. That has a very slight effect on the calculation.
UPDATE 2!
More importantly, below, we show a new universal formula which will work with all eyepieces, including the Meade Astrometric, with 50 divisions.
With the average drift times and knowing the star's declination, we can compute the LS division size in real world numbers which then can be multiplied by the number of ticks apart we found the two stars.
ρ = ( rr * t * f * cos( dec ) ) / d
where:
ρ = separation in arc-seconds
rr = rotation rate of the Earth or 15.0411
t = drift time in seconds
f = sidereal time factor or 1.0027379
dec = declination of the star, in decimal form
d = divisions or ticks on the LS, in decimal form
EYE-BALL THE ANGLE
At the end of the last drift time, it was suggested to leave the primary or A star within the band of the LCS. We need to now rotate the baader astrometic eyepiece again. Continue spinning it until the 270° marker is on or splits the A star. This action correctly orients the ocular for position angle measurement.
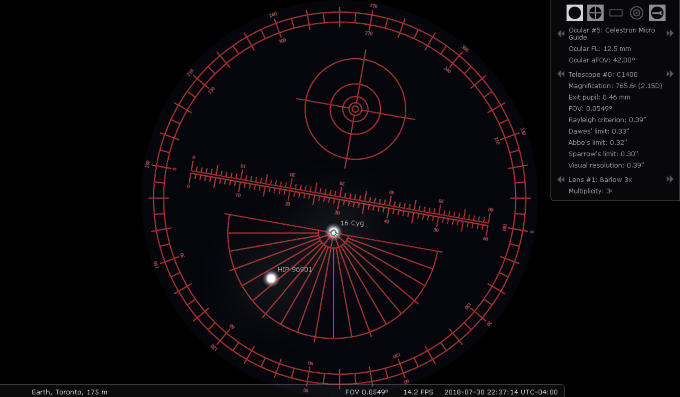
Now move the telescope so that the primary star lies in the centre of the little circle in the half protractor scale. We can immediately read the angle of the B star. In terms of which direction to go or which values to use, we can examine the LCS numbers. The outer numbers are presented clockwise and we know an SCT with a mirror diagonal presents a flipped view and therefore we measure doubles using a CW direction. The B star thusly is a bit beyond the 130° line but not quite half way. We could guess the P.A. at 133 or 134. Done!
checking / reducing
In our demonstration, we calculated the separation at roughly 38.5".
We eye-balled the position angle at roughly 134°.
The SkyTools 3 Pro software calculates the values for 16 Cyg at 39.8" and 133° (for 2018.6).
Let us visit the official source, the Washington Double Star database and examine 18-24 section given the RA of 16 Cyg is 19 hours.
It is helpful to know the official WDS designation for 16 Cyg to rapidly find the star data. Searching for "STFA 46" quickly brings up to the entry: 19418+5032STFA 46AB.
The first recorded entry in the WDS is from 1800! Then, the numbers were 37.0 and 141.
The data submitted last, in 2017, shows 39.8 and 134. Not bad.
refinements
I started "measuring" double stars in 2008 and did so very casually. When I received my Celestron Micro Guide, I read the enclosed instructions and followed them using test pairs. I was not satisfied with my initial results.
Some internet searches lead me to Ronald Tanguay's article from the February 1999 of Sky and Telescope. He had "hacked" his astrometric eyepiece to aid in his modified procedure. This article is available online.
Then I found Tom Teague’s article Sky & Tel published one year later in the July issue. His more involved procedure promised higher accuracy and did not require any external add-ons to the ocular. I tried Tom's method several times feeling more and more frustrated until I realised he did not mince words, not a single word. Finally I started getting good results with test pairs. I felt I was finally ready to measure real doubles.
Along the way I saw opportunities to improve on the workflow. I made slight modifications to Teague's method. As a spreadsheet jockey, I built files to collect data and made the formulae to begin the reduction of the data. I also noticed opportunities for cross-checking. I can double-check the sep. with a quick direct measure and double-check the angle delta against the early drift alignment position.
ready you go?
I hope this piques your interest in measuring double stars. You can measure them casually for fun for later comparisons. Keep good logs and draw good sketches. By carefully observing N and W or E directions or estimating the degrees from north, you will have a record of the position angle. By estimating separation in the field by fractions of the field of view, you can guess at the real separation.
You can start by practicing with known pairs that are not binaries or that are very long period binaries. You're after consistent results of course that you can easily and quickly reproduce.
Review the WDS "neglected" list for pairs of stars that require analysis and updating.
If you want to accurately and precisely measure doubles, you may need some hardware. A magnifier and a calibrated eyepiece may be required. Perhaps you can borrow a Barlow. If we happen to be observing at the same site, you can borrow my Micro Guide eyepiece.
more information
There are many books on the subject of double stars. Arguably, perhaps the best for serious "work" is Observing and Measuring Visual Double Stars by Argyle. Look for the second edition.
You might start reading the Journal of Double Star Observers (JDSO) articles to see what others are doing and to get a sense of how discoveries and updates for the WDS may be submitted.
Keep an eye on my astronomy blog and make a point of using the "double star" tag to focus in on relevant articles.
I’m happy to help in any way that I can!
next steps
This is part 2 of my double star series. I am considering future presentations and articles on doubles, emphasising photographic techniques, and on formally submitting measurement results for peer review. If there is sufficient interest, we can organise a workshop weekend...
Be seeing you. Contact Blake Nancarrow astronomy at computer-ease dot com for errors, omissions, questions.

